

Oh how I love fall! I used to adore the beautiful drives my parents and grandparents would take us on. I loved to see all of the rich, delicious colors we would see as we drove up the beautiful Millcreek and Big Cottonwood canyons.
Since moving to Arizona, I do miss that magical transformation of the trees but I still love fall. I am so happy to feel the refreshing dip in temperature. But I am still happy to create a little Utah fall in my home when I decorate for the autumn season.
I absolutely love sunflowers and the cheery warmth they exude. I decided to incorporate the FSJ paper fan to make various sizes.
 You can get a variety of sizes from this single die just by trimming the long, straight edge. You also will see you can change the opposite edge for added options as well. If you stick with the original die size, you need at least 3 fans cut out to make a full circle. It is a tight squeeze, but possible. If you choose to trim down your blossom, your number of fans will decrease depending on how much you trim off.

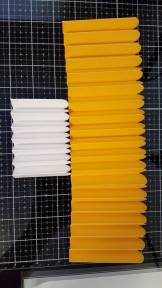
Fan fold each die cut making sure to do so the same way for each fan. Glue ends together until you end up with a circle (see photos). This is also where I decided to sharpen the edges of my flower while the glue dried.


I used scalloped and regular circles to make the centers for my sunflowers cutting 2 of the pumpkin pieces per flower as one is needed for stability on either side. For added interest, I used my hole punch on the small dark brown layer so the pumpkin cardstock would show through.


If you have ever made a paper fan, you know the trickiest part is just getting the centers on. Tip the ends in so that your edges cinch up in the center. I used hot glue and added the back center piece. Then repeated this step on the front with my layered center. Voila! A darling happy sunflower fan!


Happy Fall! Thanks so much for stopping by.

I love these! My hubby grows our sunflowers and now we can make these! Thank you!!!
LikeLike
How fun you have your own patch of sunshine!
LikeLike
Love the way you turned the fans into sunflowers with the ship of your scissors. They look so perfect!
LikeLike
Thank you so much Becky! ❤❤❤
LikeLike
Beautiful!
LikeLike
Thanks Marty!❤
LikeLike
Shannon, Your Sunflowers are GORGEOUS! I love them!🌻🌻🌻🌻🌻
LikeLike
Thank you so much Karen! 😊😊😊
LikeLike